Tips For Building Your Corner Pergola
by Chris Brandon

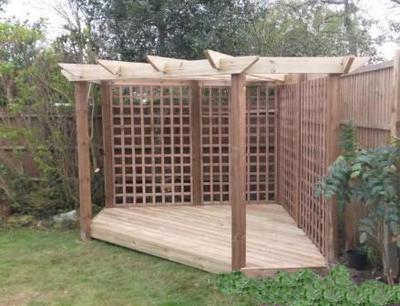
Corner pergola with deck
Firstly, the work hurdles as I saw them..
• I had a really bad and unproductive corner of the garden to fill but the corner is not a right-angle, about 105 degrees. However, a holly tree that my wife wished to keep saved the day, missing the holly actually gave the required 90 degrees to the pergola.
• The ground is not level - high at the left corner sloping some 11 inches across the width of the pergola. Decking was the solution to getting a level base.
• Finally - I was on my own but I had all the tools and a basic knowledge of carpentry. (However, as my wife has pointed out in the past, my enthusiasm for wood working often exceeds my ability!!)
Planning phase:
I made no changes to your suggested dimensions, these were fine and fitted the corner well.
I increased the post sizes to 4" - this on the advice of the fencer working at a neighbour's house. He advised that 3" posts are more likely to be warped and anyway less stable. Price difference was quite small. (When I checked at the wood yard the 3" posts were indeed generally less straight and some even twisted.)
I used 147mm x 47mm rafters - slightly thicker beams because, again, these are less likely to warp and they are only marginally heavier to handle. I think they look better.
Instead of coach bolts I used 100mm coach screws with washers and put in one at each post - made life so much easier. (I put two each side on the main transverse rafter - for effect rather than necessity)
I decided to level the tops of the posts when I put them in, setting the base level (and first post placed) at the highest point and allowing for height of the decking. I have a 6' 6" clearance. This is also the reason for raising the radiating rafters to increase internal perception of height.
I was advised not to permanently attach the trellises for ease of removal and maintenance.
Finally, the use of Metpost holders is not recommended by the fencer and are a last resort - they are expensive.
Unless your ground is impenetrable, better to dig them in and use concrete.
The Build:
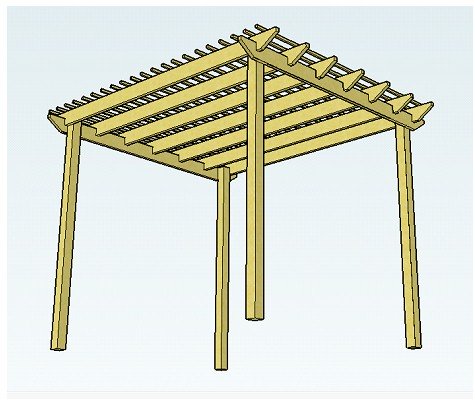
I marked out the site using your guide and dug the 7 post holes, took a morning to do. I used a rafter beam to ensure the posts were square. Making sure the 45 degrees offset on the returns is correct is the most difficult bit.
I did need a hand placing the posts and my wife held them while I measured the gaps and ensured the verticals and top levels. I placed only the three inside corner posts (1,3 and 5) in the afternoon and then left it overnight for the mortar to set. The inside distance between the posts was two measured trellis widths plus 100mm (central post size) plus 4cm - I explain the 4cm later.
Following day I set the remaining posts and to ensure the return corners were at 45 degrees I cut the return short rafter to slightly more than its required finished length and chamfered the inside end to 45 degrees. Marking the distance to the outside of the I clamped this in position at the bottom, respectively, of posts 3 and 5 and set the return corner posts 6 and 7 using the template. This template would later be cut to form the finished return so not wasted.
Posts were left to set for another 24 hours.
I then had to set the joists and lay the decking, I will not go into this now but this was a time consuming job over 2 full days. Principally because I was frightened to death of making a wrong cut as my timber had little spare length. So the old adage of "Measure twice and cut once" was rigidly applied and occasionally measured 3 or 4 times when cutting round the posts.
Anyway, with the decking laid I now had a firm and safe platform to stand my stepladder and erect the pergola rafters.
The two rear long framing rafters were measured and cut to length of the measured distance between posts 1,3 and 1,5 plus 20 inches ( this extra allowed for the increased width of the rafters when butting in).
As I was on my own I had to adapt a method to make it safe handling a large bit of wood off a step ladder. So, I cut the rafter ends and then cut out the notch for the outer end (Post 5) as per your guide. Then I nailed a short piece of light timber at right angles outward on the top of Post 1, and at roughly the depth of the rafter, and rested the un-notched end on this. Taking the ladder to post 5 I then lifted the rafter into position and making sure the notch was exactly aligned to the post and level with the top of the post, clamped it tightly using the beam clamp. Back to the other end now and I using the 2nd clam, adjust height if necessary and clamp this end tightly. To all intents and purposes this rafter is now in its permanent position. Check finally for level and then drill an 8mm hole through the rafter in the centre of Post 4 and continue about a further 10mm into the post. Tap an 8mm coach screw through the hole and tighten using a 13mm spanner. Check both ends for level and position and then drill and screw to posts 1 and 5. I then cut out the notch on Post 1 in situ. Repeat the process for the rafter between Post 1 and 3 but clearly the notch at Post 1 is reversed so cut this notch first, (using an off-cut to check both notches are big enough first), put the rafter in place and clamp at Post 3, drill and coach screw at post 2 and 3 then cut the notch at Post 3 in situ. Thereafter all as per your guide.
I am rambling now so just some points/tips I picked up on the way through:
Go to a wood-yard that supplies fencing materials rather than a DIY centre. At least 25% cheaper. My timber and accessories was £164 at the wood-yard as opposed to over £210 at B&Q plus you have more choice of timber length. They have all the necessary coach screws/bolts, 75mm wood screws, in fact all you need. (I had to go to B&Q for the small brackets for the trellis though and they were expensive - £1.14 each for a very small bit of pressed steel, coloured brown‼).
Using larger gauge timber gives a more solid look and 4"posts are preferred for reasons of straightness and resistance to warping.
Most people will not posess beam wood clamps but these can be hired very cheaply and you only need two. Do not use "G" clamps - they can slip and they will damage the soft wood irreparably by denting. Of course you can use sacrificial spacers with the G clamps but this then makes the job quite difficult to manoeuvre all the bits. I have G clamps but found them impractical.
Fix the trellis panels to the posts using 4 mini-brackets (40mm x 40mm x 10mm) per trellis using 1cm spacers each side to centre the panel. Hence the 1cm gap left each side of the trellis. Easy to fix, can be easily removed for replacement/decoration or to gain access behind the pergola. Only need 2 No 4 20mm screws per bracket, more if you feel the need. Non-rusting variety.
When cutting the notches use a good tenon saw with 3 " blade depth, Stanley or equal quality. The rigid blade makes cutting straight lines easier and the small teeth do not rip the "away" edge into splinters and therefore so much neater. Of course you have to use the rip-saw when cutting the inside cut of the notches at the post side when in-situ but otherwise my advice is to not use these for the notches. These saws do have a tendency to "wander" over long cuts unless you are very adept at using them, especially when trying to maintain angles.
I used my circular saw for cutting to length and cutting the rafter ends. Again, unless you are very experienced it is difficult to cut exactly to a line and using the hand saw takes not much more time. Better to cut slowly and get it right than take the electric option. A wrong cut stays cut‼
When laying the radiating rafters, measure as per your guide but mark the rafter centre point distances on the OUTER edge of the main transverse beam. Lay the two central beams first and then check the distance between these two and check that the marks for the two outer rafters coincide. I found, because of the angles, that a discrepancy is built in.
Otherwise no problems and if I take out the waiting time for concrete setting it took me just under 3 days.
I am very pleased with the result, the design is exactly what we wanted and it looks absolutely "in-place"
Overall, provided the builder has a good basic grasp of woodworking and of working to odd angles and cutting correctly to pencil marks (i.e. do I cut inside or outside, or even on, the pencil line?) then this is a very satisfying project. Got me out of the house and earned lots of brownie points (I am 72 y.o. by the way so brownie points are not easy to acquire)
Now for the painting.....
Chris.
Comments for Tips For Building Your Corner Pergola
|
||
|
||
|
||
|
||
|
||
|
||
|
||
Advertising Links
This page may contain advertising links earning a small commission, at no extra cost to you. It is my hope these links will help you to make informed and creative choices.
Love Gardening! Ezine
Join the 'Love Gardening!' Ezine and receive garden and landscaping tips, exclusive voucher codes and updates to the website. More...
Recently Released
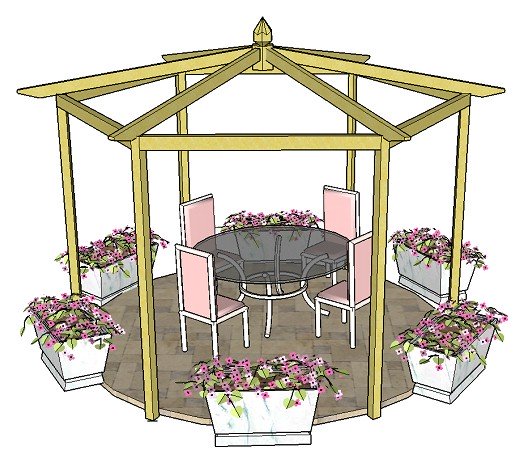
Pitched Roof Hexagonal Pergola
Other
Pergola Plans
Free Simple Pergola Plans
Attached Lean-to Pergola
Free Raised Bed Plans
Corner Pergola
Hexagonal Pergola
Asian Pergola
Seated Arbour
"The plans were great, very concise, easy to follow and I couldn't have managed without them!" T.
“Well done for a really useful site!” Mike.
Love the templates for the Rafter Tails! Using Design #5. Thanks so much." Laura.
"I love your website! Your entire site is incredible. I was able to get ideas for my pergola, which looks fantastic." Wayne.
Great service. Now all I have to do is build it! Martin.
"Your plans look amazingly comprehensive. I see you are intending putting the plans for the corner pergola on this fabulous site. Could you please tell me when the corner pergola plans will be available to purchase...yours is the nicest design I have seen!" Michelle.
Plants and Seed Offers
Pergola Kit and Accessories Offers
£340 off


Sales & Offers
Beautiful 'Gainsborough' gazebo
Save £204!
See my 'Fantastic Offers' page for more bargains on pergola kits, tools and all things gardening!

