Alan's Patio Pergola
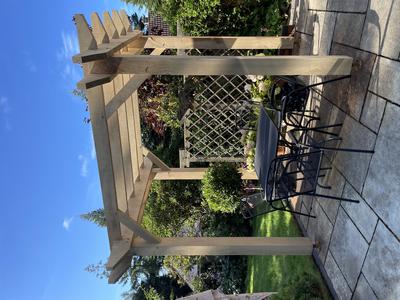
What A Stunner!
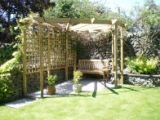
Alan, your patio pergola is amazing, and a great example of how the free pergola plans can be adapted to create any style of pergola. What a stunner it is!
We'll be taking a look at how it came about and what you did to create such a good-looking structure.
"Thank you for the advice in your superb website.
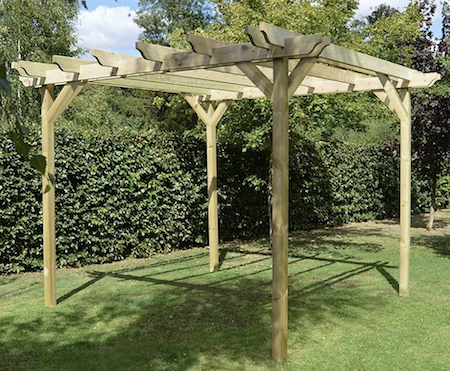
We wanted a more shady place on our patio so, with the help of your plans, we amalgamated a few of the designs and I have now constructed my 3m x 3m (10ft x 10ft) x 2.4m (8ft) high pergola using elements of your plans.
All made from green oak. I removed the iron marks from the sawmill using 'Bar Keepers Friend' - the oxalic acid in it did the trick, so that it weathers down evenly.
We are very happy with it and the balance is just right."
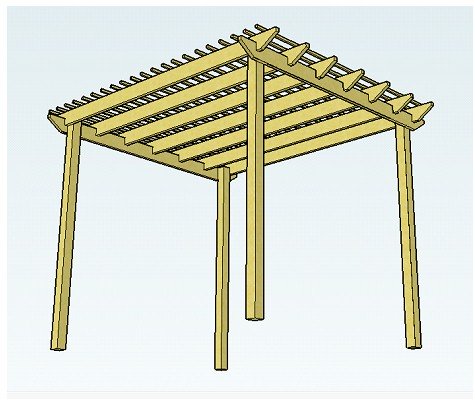
The free pergola plans set out the basic construction techniques, and you then have free reign to make the pergola chunkier, bigger, longer, wider, taller, rafters running in only one direction, double side rafters or beams, and all manner of different fixings, depending on where you put your pergola. How good is that?
Let's look at the basic pergola design, and then see how Alan adapted the plans to build his wonderful patio pergola.
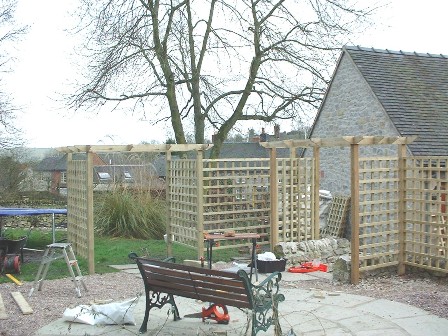
Some years ago, I built a set of three interconnected pergolas to enclose a dining and seating area for a client. Here they are.
A box pergola is good example to use for the basic plans because it has rafters running in both directions, so I created the free pergola plans from these. The box pergola, incidentally has now come to mean something slightly different: a modern style pergola with no rafters tails contained within a cube, hence looking more box-like.
Anyway, you can just see the rafter tail ends sticking out on both sides of the pergola. Of course, it isn't necessary to have rafters running in both directions and often people have them running in only one. This is just one way to make your pergola your own.
A Patio Pergola To Be Proud Of
Now let's take a look at how Alan adapted the free pergola plans to such good effect.

The first thing we notice is the double side rafters, or beams, which support the main rafters. Good move, Alan. I like it. This gives his pergola a very distinctive style and the pergola a substantial feel. Alan was able to use 6" posts without it looking too top heavy.
The rafters are all the same size, so the double side rafters and the main rafters running from front to back look well-balanced and perfectly proportioned. All parts works brilliantly together.
Alan has used a raised rafter style (the option I personally prefer because it gives the pergola roof a three-dimensional feel). The free plans give the option of three different rafter styles: the flush- fitting rafter, the raised rafter, and the un-notched rafter. These are easy enough to do with a little guidance.
Using corner braces makes the structure much more stable. Here, Alan has used a brace the same thickness as the rafters and attached it to the centre third of the post. This will give strength to his pergola.
Having a brace run along the length of the rafter edge also reduces the beam span: a design feature important for larger pergolas in order to reduce the length needing support from the side rafters, so that the main rafters are less likely to sag; perish the thought!
Attaching posts to the ground, whatever that ground maybe, can be done in several ways. It is important to keep moisture away from the post base. It is why post anchors are used for this purpose. Different types are available for different situations. My pergola has been standing for over 30 years and still no sign of rot in the posts, due to the posts sitting in post anchors. The different options are explained in the free plans.
Alan has used a raised galvanised anchor to attach the posts to the patio slabs, a relatively new type of anchor that has become available, in order to tackle the problem of rotting wood. If you look carefully at his photo, you can see the posts sit well above the ground. This will ensure that the wood stays dry.
What Timber Should I Use To Build My Patio Pergola?
Softwood or hardwood; that is the question.
It's important to remember that if you use a softwood to construct your pergola it needs to be treated or tanalised. As well as using post anchors this will also protect your wood from rotting.
Visitors to my site often ask about the best type of wood to build a pergola. There are many types available in timber yards and DIY stores. These tend to be softwoods.
Alan sourced green oak from a sawmill for his patio pergola. This is a hardwood and therefore much more resistant to weather. It is strong, sturdy and durable. It really doesn't require any maintenance apart from a coat of coloured preservative if you wish to retain the original colour; if not, you can just leave it to age naturally to a silvery grey.
Alan has given us a very useful tip for removing the iron marks from the sawmill. You can clearly see them on the front face of the pergola.
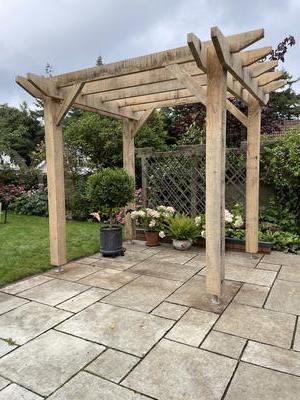
"I removed the iron marks from the sawmill using Bar Keepers Friend - the oxalic acid in it did the trick, so that it weathers down evenly."
Here's how oxalic acid works:
Oxalic acid is an organic compound found in many plants, including leafy greens, vegetables, fruits, cocoa, nuts, and seeds. In plants, it's usually bound to minerals, forming oxalate. The terms "oxalic acid" and "oxalate" are used interchangeably in nutrition science.
Oxalic acid's main applications include cleaning or bleaching, especially for the removal of rust (iron complexing agent). Its utility in rust removal agents is due to its forming a stable, water-soluble salt with ferric iron, ferrioxalate ion.
What a difference it made to the sawn wood.
Hardwoods
There are several hardwoods that stand out as the best choice for your pergola: green oak, which has a lovely pale oak colour, cedar, with its striking red tones and some of the many different coloured tropical hardwoods available nowadays. Their natural beauty, with distinctive hues and grain variations, create a warm and inviting atmosphere.
They are all prized for their durability and resistance to decay and insects, ensuring longevity with minimal maintenance.
They are reasonably easy to work with, meaning you can create airy, open structures ideal for leisurely outdoor lounging or dining. However, because of their dense nature, they will be heavier than a softwood to handle and, it must be said, the hardwoods are considerably more expensive, so do bear these things in mind when you are planning your project.
Over time, the weathering enhances the rustic charm of hardwoods. Choosing a hardwood for your pergola not only adds functional elegance but also harmonises effortlessly with all types of outdoor space, but especially near to the house, and particularly next to modern architecture, where it can look incredibly stunning.
Let's take a look at another way of achieving a similar construction with the double beams using considerably less elbow grease, though you do loose the advantage of building a bespoke structure, especially in terms of post and rafter size and the type of wood available.
Pergola Kits
If you'd like a pergola in a similar style, with a double beam, but would like all the cutting and notching done for you, you may prefer a kit. There are several around in different styles and colours, usually softwood, including an attached lean-to style, creating a wonderful outdoor room attached to the house.
A Patio Pergola For Years To Come
I should imagine you are incredibly pleased with your new pergola, Alan. I'm sure you will inspire many others to have a go.
I hope you enjoy it as much in the years to come as I've enjoyed seeing it finished. Thank you for sharing this with us. It is truly magnificent!

Advertising Links
This page may contain advertising links earning a small commission, at no extra cost to you. It is my hope these links will help you to make informed and creative choices.
Love Gardening! Ezine
Join the 'Love Gardening!' Ezine and receive garden and landscaping tips, exclusive voucher codes and updates to the website. More...
Recently Released
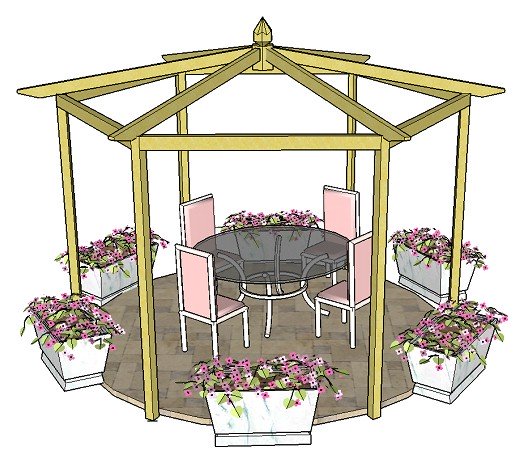
Pitched Roof Hexagonal Pergola
Other
Pergola Plans
Free Simple Pergola Plans
Attached Lean-to Pergola
Free Raised Bed Plans
Corner Pergola
Hexagonal Pergola
Asian Pergola
Seated Arbour
"The plans were great, very concise, easy to follow and I couldn't have managed without them!" T.
“Well done for a really useful site!” Mike.
Love the templates for the Rafter Tails! Using Design #5. Thanks so much." Laura.
"I love your website! Your entire site is incredible. I was able to get ideas for my pergola, which looks fantastic." Wayne.
Great service. Now all I have to do is build it! Martin.
"Your plans look amazingly comprehensive. I see you are intending putting the plans for the corner pergola on this fabulous site. Could you please tell me when the corner pergola plans will be available to purchase...yours is the nicest design I have seen!" Michelle.
Plants and Seed Offers
Pergola Kit and Accessories Offers
£340 off


Sales & Offers
Beautiful 'Gainsborough' gazebo
Save £204!
See my 'Fantastic Offers' page for more bargains on pergola kits, tools and all things gardening!
